Happy Anniversary Card

Hey Krafty friends, this card was made from Spellbinders’ Sentimental Ampersand - Small Die of the Month for January 2023. I always wanted an oversized ampersand and I thought this one was pretty and perfect for my needs, so I purchased it. This creation involved just die cutting and dry embossing! Not hard…the hardest part was just putting the die cut pieces together. I’ve always wanted to try a mostly white card with just a hint of color.
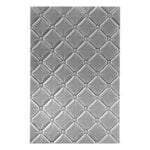
Step 1: Embossing for the background
I made a card base out of some Neenah Classic Crest 110 lb. I took the base and put one side of it in the embossing folder. The embossing folder used is from Spellbinders. It is their Tufted 3-D embossing folder. It is such a pretty one!
Step 2: Die cutting for all the elements
For the decorative elements/sentiments, I used Spellbinders’ Sentimental Ampersand - Small Die of the Month for January 2023. I cut the more decorative ampersand twice with white card stock and once using the more simple ampersand die, using a matte gold card stock I had on hand from Tonic Studios. I doubled the white die cuts for some dimension and cut the gold out for a little color. I glued the two white pieces together and then placed the gold one behind the white one, but kind of offset the gold one so you could see the color and make the white ampersand pop from the white background!
Then I used the flowers that came with the die set for the decorative elements. I cut all of the flowers and leaves out of the white card stock. But, for the centers of the flowers I used the same matte gold card stock to make the flowers stand out just a little. Then I glued the pieces of my flowers together and let dry.
Lastly, I cut the sentiments out once, using the gold card stock. All die cutting was done using my Spellbinders Platinum 6 machine.
Step 3: Putting it all together
So, putting it all together was the hardest part of this card. I laid the ampersand and the sentiments out on the card first, where I thought I would want them on the tufted background. I then glued the ampersand down with a good bit of liquid glue so that it would stick to the 3-D background. I laid some stamping blocks for some weight on top while it dried. Next, I arranged how I wanted the flowers and leaves on top of the ampersand. I then took a piece of press and seal to pick up all of the small pieces of flowers and leaves to keep them together and placed liquid glue on the back and glued them down to the ampersand and card base. Again I placed some stamping blocks on top for weight on them while it dried. I removed the press and seal once mostly dried, and then placed the gold sentiment pieces down on to the background with liquid glue. Once again putting weight on top with the stamping blocks while they dried. This was the hardest part…getting everything to stay glued down on the 3-D tufted background…lol!
So, there it is! The step-by-step process for the Anniversary card for my hubby this year! I love how the mostly white came out with the pop of gold! My hubby loved his card too which is the most important thing! And the Sentimental Ampersand die is beautiful if you can swing the purchase as it’s still available. I hope you guys like this card, and that it gives you some inspiration and thought to trying an all white or mostly white card. Have you tried creating an all white card? If so, let me know in the comments and how it came out. Also, feel free to contact me if you have any questions about how I made this card or the supplies I used.
Your Krafty Friend,
Tiffani
- Spellbinders Platinum 6.0 Cut & Emboss Machine - Spellbinders

- Merchant:A Cherry On Top
- Price: $119.99
- Spellbinders - Platinum 6 - Die Cutting and Embossing Machine

- Merchant:Scrapbook.com
- Price: $101.99
- Spellbinders - 3D Embossing Folder Collection - Embossing Folders - Tufted
- Merchant:Scrapbook.com
- Price: $14.24
- Tufted 3D Embossing Folder - Spellbinders - June 2022

- Merchant:A Cherry On Top
- Price: $14.99
- Solar White Neenah 110lb Classic Crest Cardstock - Neenah Paper

- Merchant:A Cherry On Top
- Price: $37.49