A Card Duo for Valentine’s Day!

The 1st Card I completed

2nd Card!
Hey Krafty friends, these cards were made using various products I had on hand. I wanted to use some products I never used before that had been sitting in my stash. These creations involved some dry embossing, heat embossing, ink dragging, ink blending, die cutting and stamping…whew!!! A little fussy, but not really hard. These were fun cards to make. Read below for the steps.
Step 1: Using an embossing folder and ink for the backgrounds
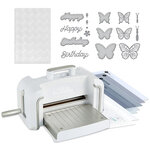
I grabbed some red cardstock from my stash and cut a couple panels down using an etched edge rectangle die. Then I moistened one of the panels of the cardstock so it can loosen up the fibers of the paper so that it wouldn’t tear when using in the 3D embossing folder. Then I placed the paper in the Sizzix - 3D Textured Impressions - Embossing Folder - Hearts and ran it through my Spellbinders Platinum 6 machine. Having the new Universal Plate System from Spellbinders really helped me get a good sandwich for this 3D embossing folder! For the first panel I used my ink blending brush and lightly blended some white pigment ink over the embossed panel trying to only put the ink on the raised hearts. I didn’t initially love this one so I put it to the side and tried another technique. For the second panel, after embossing it, I then used my white pigment ink pad from Scrapbook.com and lightly ran it across the top of the embossed panel to bring out the raised 3D hearts! I liked this panel better so, I created my first card using this second panel.
Step 2: Die cutting and stamping for the sentiments
For the large sentiment, I used Scrapbook.com’s “LOVE” word die. I cut one out of white cardstock scrap and another out of a black glittery cardstock scrap piece. Doing this also gave me a two for one sentiment. As I used one with a white outline and black words inside the outline and vice versa for the other. For the first card, I used the white outline with black letters. Then I stamped “Love You” in black Versa Fine ink on some white cardstock scrap paper using a Hero Art’s stamp set I had in my stash. I then used a banner die to cut out the stamped sentiment.
For the second card, I used the black outline LOVE die with the white letters. Then I stamped “Love You” in my white pigment ink ink on some black cardstock scrap paper using the Hero Art’s stamp set. While the pigment ink was still wet, I added Brutus Monroe’s Alablaster embossing powder and heat embossed the sentiment. I then used a banner die to cut out the stamped sentiment and cut a fish tail at the left end because I knew I wanted to place the banner to hang off the right side of my card.
Step 3: Putting them all together
So, putting it all together was the more involved part. For the first card, I glued the white die cut LOVE outline on the embossed background. Next, I glued each letter cut out of the black cardstock into the outline. The key for this to work was using enough liquid glue so that the letters would stick on the background with all the raised hearts! I then put some foam tape on the back of my stamped sentiment and glued it down in the center underneath the LOVE die cut on the embossed background. Lastly, I adhered that first completed background panel onto my white card base, using some foam tape for dimension. I placed it in the center of the card base to leave a white border.
For the second card, I wanted to make the embossed panel pop more, so I ink blended some black ink along the outside borders of the panel. Next, I glued the black die cut LOVE outline on the embossed background. I glued each letter cut out of the white cardstock into the black outline. I then put some foam tape on the back of my heat embossed sentiment and glued it down to the right of the background panel underneath the LOVE die cut. Lastly, I adhered the completed background piece onto my white card base, using some foam tape for dimension. I placed it in the center of the card base to leave a white border.
So, there it is! The step-by-step process for Valentine’s Day card duo. I think the cards came out well. I love the look of the white pigment ink dragged across the raised hearts! I also liked getting a two for one with the LOVE die. It inspired me to make the second card. I hope you guys like this card as well, and that it gives you some inspiration. Which card do you like the best? Feel free to contact me if you have any questions about how I made this card or the supplies I used.
Your Krafty Friend,
Tiffani


- Mini MISTI - Most Incredible Stamp Tool Invented
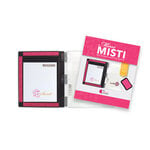
- Price: $49.99


- Sizzix - Making Essential Collection - Foam Tape

- Price: $3.60